Secrets of Sharpening: Bevel Angles and Blade Geometry
What is the right bevel angle for sharpening my plane or chisel blades? This is a question we get asked often in our workshops and many folks have a hard time grasping the basic concepts of bevel angles and blade geometry as they relate to getting a sharp cutting edge on your tool. In this short article I will go over the basics of blade geometry you need to understand to help you improve and master your sharpening technique.
The Only Angle that Really Counts. The only angle that really counts when determining a sharp cutting edge is the angle at the edge of the blade. This takes us to the critical definition of what is sharp? The line of intersection where these two planar surfaces meet is called the “cutting edge”. A blade is perfectly sharp when the two planar surfaces of the blade intersect with each other exactly along the last atom of space.

Of course, “the last atom of space” is a theoretical construct. To sharpen, we use a rough surface (e.g. sharpening stone) to wear down the metal on the opposite sides of the cutting edge until these planar surfaces are smooth and flat as we can get them and they intersect to create a sharp enough edge. What is sharp enough? When our hand cannot detect any improvement to the surface of the wood if we planned it with a sharper blade, we have reached “sharp enough”.
In theory the angle that the two planar surfaces of a blade meet at is not important. What's important is that the opposite sides of the blade are flat (planar surfaces) and they meet along a line (cutting edge). The trials and error of woodworking over the centuries has shown us that a sharp edge for woodworking is best achieved if the angle of the two planar surfaces meet somewhere between 25 and 45 degrees, with a sweet spot at 25 to 30 degrees. This has more to do with having a strong cutting edge rather than a sharp edge. For example, a razor blade has a sharp cutting edge and the angle that its two planar surfaces meet is significantly lower that 25 to 30 degrees, but a razor blade cannot plane wood because it is too weak for the forces of woodworking.
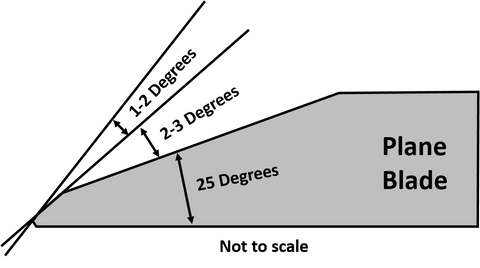
Blade Angles. For woodworking, our blades must have two characteristics: a sharp cutting edge and a strong blade. How do we achieve this? To create a strong blade, we use advanced metals with a Rockwell hardness rating around 62 (any harder and they become brittle) and we use a thick blade, around .125 inches thick. Sharpening this hard, thick blade, and keeping a strong cutting edge is the challenge. This is where bevel angles come in. We use bevel angles to gradually bring the two planar surfaces together. Using bevel angles requires the least amount of effort in removing metal, thus making it the fastest way to sharpen. The diagram below shows you the names and spatial relationship of the common blade bevel angles. Note: not all woodworkers use all these bevels, it depends on your sharpening technique.

You can see in the diagram above, the only angle that counts is where the cutting edge is formed; where the back bevel meets the tertiary bevel, in this case.
The primary bevel for chisels and plane blades is normally 25 degrees (a time-tested angle). If you look at the blade diagram above its perfectly acceptable, from a sharpness perspective, to hone the primary bevel flat and hone the back of the blade flat and where these two meet you can achieve a sharp cutting edge. The practical issue with this method is that it will take you an awfully long time since modern blades are both thick and hard.
A much quicker approach is to only hone a small portion of the primary bevel, creating a secondary bevel. Once the secondary bevel is created then polish just along its edge creating a tertiary bevel. On the back of plane blade, hone just on its edge, instead of flattening the entire back, creating a back bevel that meets the tertiary bevel creating a sharp edge. Note: do not use a back bevel on chisels; plane blades only.
This is the method we teach at Rob Cosman’s Training the Hand Workshops. You can use a jig to get these angles but setting up a jig takes additional time causing folks to delay sharpening – not good! Instead, we teach and recommend free-hand sharpening. Once mastered, free hand sharpening takes about 30-40 seconds to achieve these bevels and sharpen your blade!
Many folks get hung up on the precise angles of these bevels. The below diagram shows what you are shooting for, but it is only a guide, do not try to measure the angles, just get a feel for them.

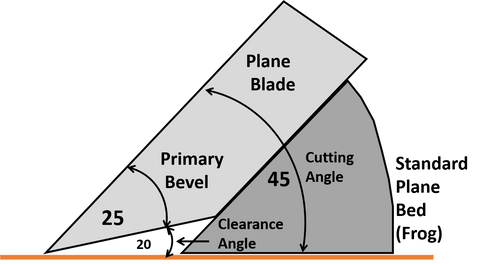
Attack or Cutting Angle. A standard bench plane uses the blade in a bevel-down orientation, with a chip breaker and cap iron (I prefer standard angle bench planes over low angle bench planes, except in block planes). Thus, presenting the back of the blade to the wood. The angle at which the blade is presented to the wood is called the cutting angle or angle of attack. With a standard bench plane, the cutting angle is typically 45 degrees, a time-tested angle that works well for planing all but the most difficult woods. If you use a back bevel, as I recommend, then you have increased the 45 degree angle that the back of the blade is presented to the wood by the angle of the back bevel; one or two degrees at most. An insignificant change in angle of attack, especially considering the sharpening time you saved by using the back-bevel technique.

Clearance Angle. A clearance angle (also called a relief angle) is the angle between the wood and the blade bevel when in a bevel-down (standard) configuration. This angle needs to be at least 12 degrees for the blade to bite into the wood (another time-tested angle). With a plane’s bed angle of 45° and a primary bevel angle of 25°, the clearance angle is 20° (45-25=20), which works well. Using secondary and tertiary bevels will reduce this angle slightly, but not enough to worry about.

Over time as you keep sharpening your blade you will continually reduce this clearance angle, finally reaching the point when either the blade wont bite into the wood or your secondary bevel is so large that its taking you too long to sharpen. When this happens, it is time to go to the grinder and re-establish your 25 degree primary bevel and start the process all over again.
I hope this helps.
Luther


